
CoMatex WPC Fence Installation Guide
How to Install WPC Fencing
CoMatex WPC (Wood-Plastic Composite) fencing provides a modern, low-maintenance alternative to traditional timber fencing. With horizontal fence planks and compatible posts, rails and accessories, it is designed to create a clean, contemporary finish for residential outdoor spaces.
This guide explains the main steps involved in planning and installing your CoMatex WPC fence, from measuring your boundary to assembling the panels and completing the final checks.
Important: Always follow the installation instructions and technical specifications supplied for your particular CoMatex products. Installation requirements may vary depending on the fence configuration, ground conditions, wind exposure and fixing system.
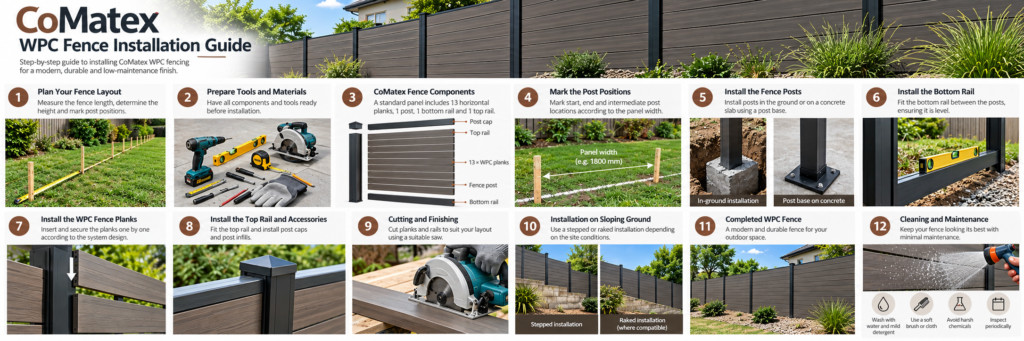
1. Plan Your Fence Layout
Before ordering materials or starting installation, measure the area where you intend to install the fence.
Measure your fence
Measure the total fence length.
Determine your required fence height.
Identify corners, ends, gates and changes in direction.
Check whether the ground is level or sloping.
Confirm property boundaries and any applicable council or building requirements.
Calculate the materials required
Your material list will depend on the length and height of the fence and the selected configuration.
Typical components include:
WPC fence planks
Fence posts
Bottom rails and top rails
Post caps
Post infills, where required
Post bases or mounting accessories, where applicable
Compatible fixings and installation hardware
CoMatex standard fence panels are configured with 13 horizontal planks. If you are planning a shorter fence, check the available panel configurations before ordering.
Allow for additional posts and accessories at corners, ends and gate openings as required by your layout.
2. Prepare the Tools and Materials
Prepare all components before installation to help avoid delays.
Recommended tools
Tape measure
Spirit level or laser level
String line and marking tools
Drill and suitable drill bits
Screwdriver or driver bits
Saw suitable for cutting the specified WPC and aluminium components
Spanners or other tools required for the selected fixings
Personal protective equipment, including safety glasses, gloves and hearing protection
You may also need equipment for excavation and concrete work, depending on the post installation method.
Check that all tools, fixings and accessories are suitable for the materials being installed.
3. Mark the Post Positions
Mark the fence line and proposed post locations before digging holes or fixing posts to a supporting structure.
Post spacing must match the panel dimensions and the requirements of the CoMatex fence system. Do not assume that the nominal panel width is the same as the required centre-to-centre post spacing.
Check the actual dimensions of the posts, rails and connecting components before marking out the positions.
For a straight fence:
Establish the fence line using a string line.
Mark the starting and ending positions.
Mark intermediate post locations according to the selected panel configuration.
Check corners, ends and gate openings.
Confirm the total layout before installing the posts.
Accurate marking helps maintain consistent panel widths and reduces the need for adjustments during assembly.
4. Install the Fence Posts
The posts provide the primary support for the fence. They must be installed securely and aligned correctly before the fence planks and rails are fitted.
The installation method depends on the post type and site conditions.
Posts installed in the ground
Where posts are installed directly into the ground or concrete footings:
Check underground services before excavation.
Assess the soil conditions and ground stability.
Determine the footing dimensions and depth based on the fence design, height, wind exposure and site requirements.
Install the posts plumb and at the correct spacing.
Allow concrete or other footing materials to achieve the required strength before loading the posts.
Do not use a generic footing depth or diameter without confirming that it is suitable for your site.
Posts fixed to a concrete slab or supporting structure
Where a compatible post base is used:
Confirm that the post and base are suitable for the application.
Check the concrete thickness, condition and edge distances.
Use compatible anchors and fixings appropriate for the substrate and expected loads.
Ensure the posts are correctly aligned and securely fixed.
A post base must not be assumed suitable for every fence height, wind condition or mounting surface.
5. Install the Bottom Rail
Once the posts are securely installed and aligned, fit the bottom rail according to the CoMatex system design.
Check that the rail:
Is compatible with the selected posts and fence planks.
Is level or positioned at the intended height.
Is correctly supported and secured.
Allows for any required drainage, clearance and movement.
For sloping ground, determine whether the fence should follow the slope or use a stepped arrangement. The appropriate approach depends on the fence system and the appearance you want to achieve.
6. Install the WPC Fence Planks
With the posts and bottom rail in position, begin assembling the horizontal planks.
Check the planks for damage before installation.
Confirm the correct orientation of the first plank.
Insert or secure the plank using the designated fixing method.
Continue fitting the remaining planks according to the system instructions.
Check the alignment and appearance as you progress.
Avoid forcing the planks into position or damaging their edges during assembly.
For a standard CoMatex panel configured with 13 horizontal planks, install the planks in the specified arrangement for that panel.
Follow the product instructions for clearances, expansion allowances and fixing points. WPC materials can expand and contract with temperature changes, so the required movement allowance must not be omitted.
7. Install the Top Rail and Accessories
After the planks have been installed, fit the top rail and the relevant finishing accessories.
Depending on your configuration, these may include:
Top rails
Post caps
Post infills
Compatible joining or fixing components
Check that the top rail is properly aligned and secured and that the finished fence has a consistent appearance.
Use compatible components and avoid substituting fixings or accessories without confirming their suitability.
8. Cutting and Finishing
Some projects require planks or rails to be cut to suit the layout.
Before cutting:
Measure each component carefully.
Confirm the required finished length.
Use a suitable saw and cutting method for the material.
Support the component to prevent damage during cutting.
Wear appropriate protective equipment.
Remove cutting debris and inspect the cut edges. Do not remove material from structural components in a way that compromises their strength or fixing requirements.
Where a fence meets a wall, gate or corner, check that the finished connections are secure and visually consistent.
9. Installation on Sloping or Uneven Ground
Sloping ground requires additional planning to maintain the intended fence height, appearance and structural performance.
Two common approaches are:
Stepped installation: Individual fence sections are installed at different heights to follow the general slope in a series of steps.
Raked installation: Fence sections follow the slope of the ground, where the fence system is specifically designed to accommodate this arrangement.
Not every WPC fence system supports raked installation. Confirm compatibility before proceeding.
For retaining walls, significant level changes or unstable ground, assess the supporting structure and any additional loads before installing the fence.
10. Final Inspection
After assembly, inspect the completed fence before considering the installation finished.
Check that:
All posts are secure and correctly aligned.
Rails and planks are properly fitted.
Required movement clearances have been maintained.
Fixings are secure and compatible with the system.
Post caps and other accessories are fitted correctly.
There are no damaged or visibly defective components.
Gates, where installed, operate without interfering with the fence.
The installation complies with applicable site and regulatory requirements.
Correct any issues before the fence is put into service.
11. Cleaning and Maintenance
CoMatex WPC fencing is designed to provide a low-maintenance finish without the routine painting, staining or sealing generally associated with timber fencing.
For routine care:
Wash the fence with water and a mild detergent when required.
Use a soft brush or cloth to remove dirt.
Rinse away cleaning residues.
Avoid harsh chemicals and abrasive cleaning methods unless specifically approved for the product.
Inspect posts, rails and fixings periodically for signs of movement or damage.
Follow the product care instructions to maintain the appearance and performance of your fence.
Frequently Asked Installation Questions
Can I install CoMatex WPC fencing myself?
DIY installation may be suitable for customers with the necessary tools, skills and understanding of the product instructions. Post installation, footing design and structural requirements need particular attention. If you are unsure about the site conditions or fixing method, consult a suitably qualified professional.
How far apart should WPC fence posts be?
Post spacing depends on the actual panel dimensions and the requirements of the selected fence system. Measure the components and confirm the required post spacing before installation. Do not determine spacing from the nominal panel width alone.
Can I install WPC fencing on an existing fence?
Potentially, but the existing posts and supporting structure must be assessed for condition, strength, spacing and compatibility with the CoMatex system. Do not attach new panels to existing supports unless they are suitable for the additional loads.
Can WPC fencing be installed on a sloping block?
It may be possible using a stepped layout or a compatible raked installation. The appropriate method depends on the fence system, ground slope and required finished appearance.
Does WPC fencing need expansion gaps?
WPC materials can expand and contract with changes in temperature. Follow the product-specific instructions for clearances, fixing positions and movement allowances.
Where can I buy CoMatex WPC fencing?
You can browse CoMatex WPC fence planks, posts, rails and accessories through our online store. Check your required fence dimensions and quantities before ordering. If you need help selecting components, contact our team for assistance.
Need Help with Your WPC Fence Project?
CoMatex supplies WPC fencing products and components for DIY projects, homeowners, builders and fencing professionals.
Contact our team for help with product selection, quantities and compatible components before placing your order.